Key Takeaways
-
Mark a 3/16-inch reveal between the door jamb and trim to prevent interference with door operation and ensure a professional appearance.
-
Use precision miter cuts at corner joints and ensure all three pieces (header and two legs) are dry-fitted before fastening to avoid visible gaps.
-
Choose solid hardwoods for stained finishes or poplar/MDF for painted trim, and apply back-primer to reduce moisture absorption and warping.
-
Professional door trim installation typically takes 1-3 hours per door and includes proper fastening with finish nails and construction adhesive for long-lasting results.
-
Coordinate door trim styles with baseboards, window casing, crown molding, and wainscoting throughout your home to create a cohesive, high-end interior design.
-
Quality door trim instantly signals craftsmanship to buyers and appraisers, making it a cost-effective upgrade that significantly improves property value and perceived luxury.
Door trim installation is one of the most impactful upgrades you can make to any room. A beautifully framed door adds character, elegance, and a finished look that ties a space together. Whether you are a homeowner wanting to refresh your interiors, an interior designer sourcing skilled craftsmen, or a real estate developer adding premium finishes, door trim matters more than you might think.
In this guide, you will learn everything about door trim installation — from choosing the right style to understanding the installation process. We will also explore how professional custom carpentry elevates door trim beyond basic builder-grade results. If you want results that last and impress, this article is for you.
What Is Door Trim and Why Does It Matter?
Door trim — also called door casing — is the decorative molding that frames a door opening. It covers the gap between the door frame and the surrounding wall. Beyond function, door trim adds visual polish to any room. To learn more about carpentry and how trim work fits into the broader craft, it helps to understand how this detail contributes to a home’s overall design language.
Trim work is one of the clearest signals of quality in any home. Builders and designers know that the right trim can make a standard room feel custom and refined. Poor trim work, on the other hand, makes even expensive finishes look unfinished. That is why professional door trim installation is always worth the investment.
Explore more about how molding details can transform your space with layered, precision-crafted accents throughout your home.
Popular Door Trim Styles to Consider
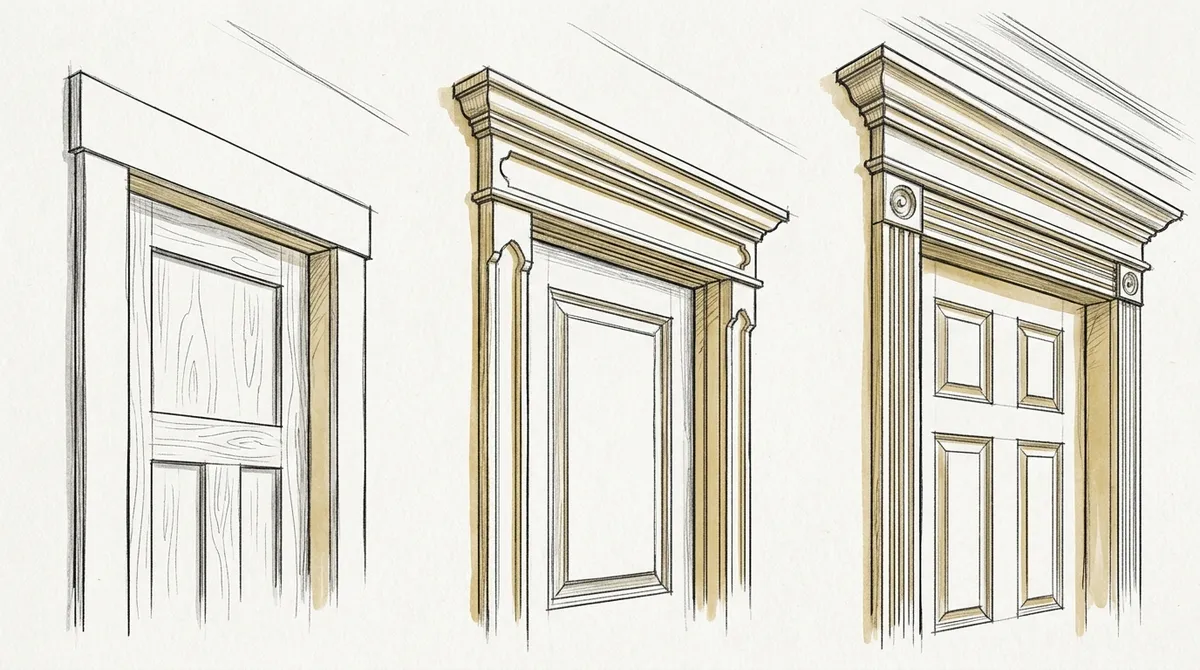
Choosing the right trim style sets the tone for your entire interior. Here are the most common styles used in custom carpentry today:
- Colonial Casing: A timeless profile with gentle curves. Works well in traditional and transitional homes.
- Craftsman Casing: Clean lines and flat profiles with a distinctive corner block. Perfect for bungalows and modern farmhouse designs.
- Ogee Profile: An S-shaped curve that adds elegance. Common in formal living rooms and luxury properties.
- Flat Modern Casing: Minimal and sleek. Ideal for contemporary and minimalist interiors.
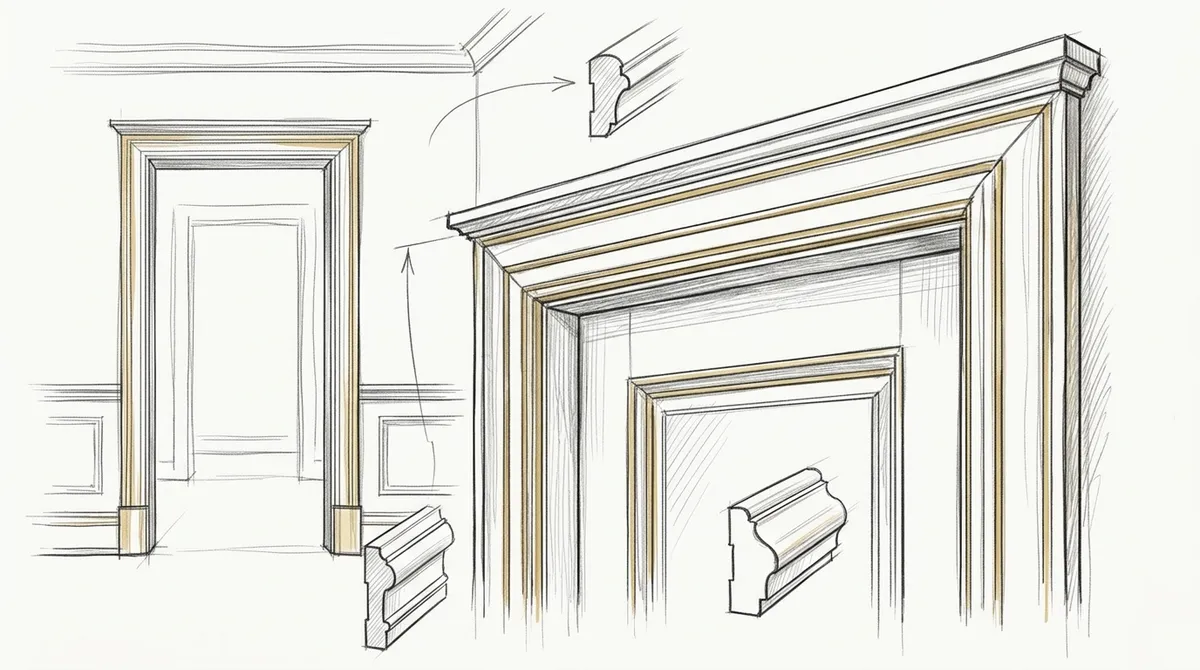
- Layered Casing: Multiple trim pieces stacked for a built-up, architectural look. Used in high-end custom homes.
- Fluted Casing: Vertical grooves that reference classical architecture. Pairs beautifully with wainscoting and coffered ceilings.
The right style depends on your home’s existing architecture and your design goals. A professional carpenter can help you match or intentionally contrast styles for a custom look.
Key Benefits of Professional Door Trim Installation
Many homeowners underestimate how much professional craftsmanship matters. Here is why hiring an expert makes a real difference:
- Precision cuts: Perfect miter joints and clean lines that align flawlessly.
- Proper material selection: Choosing wood species, MDF, or composite that suits your environment.
- Seamless finishing: Proper filling, sanding, and priming for a paint-ready surface.
- Custom profiles: Access to unique trim profiles that elevate your home beyond builder-grade options.
- Long-lasting results: Secure fastening techniques that keep trim in place for years.
These benefits add up to a result that looks professional and stands the test of time. For homeowners investing in their property, this is especially important.
Step-by-Step Overview of Door Trim Installation
Understanding the process helps you know what to expect when working with a professional. Here is a simplified look at how door trim installation works:
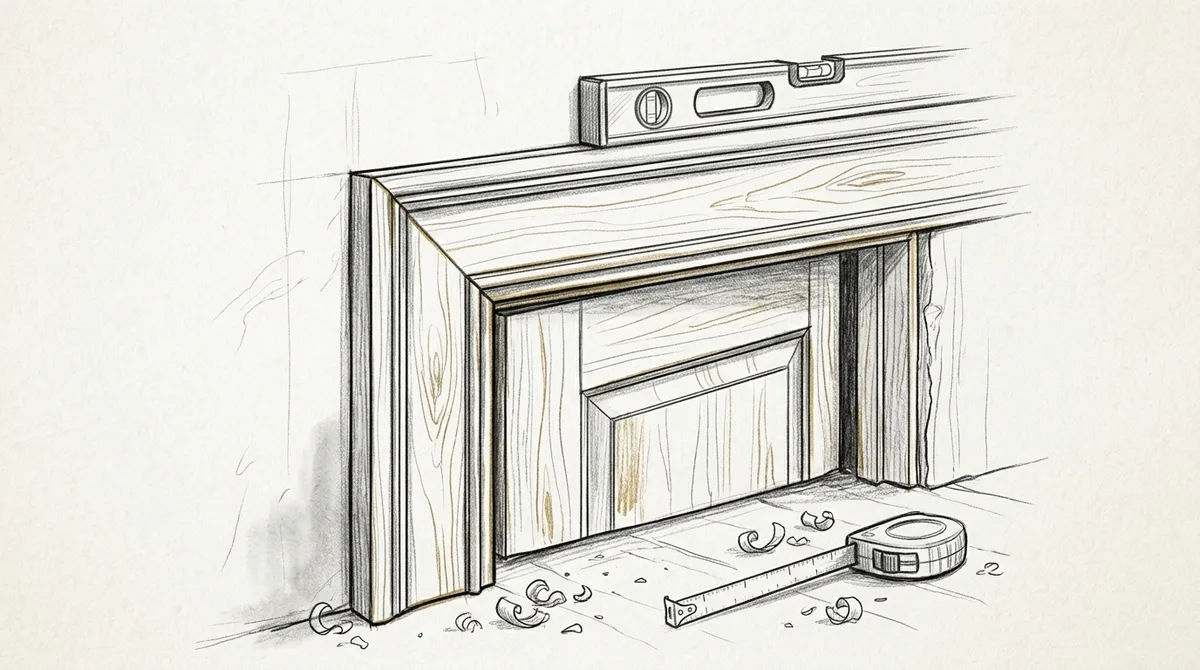
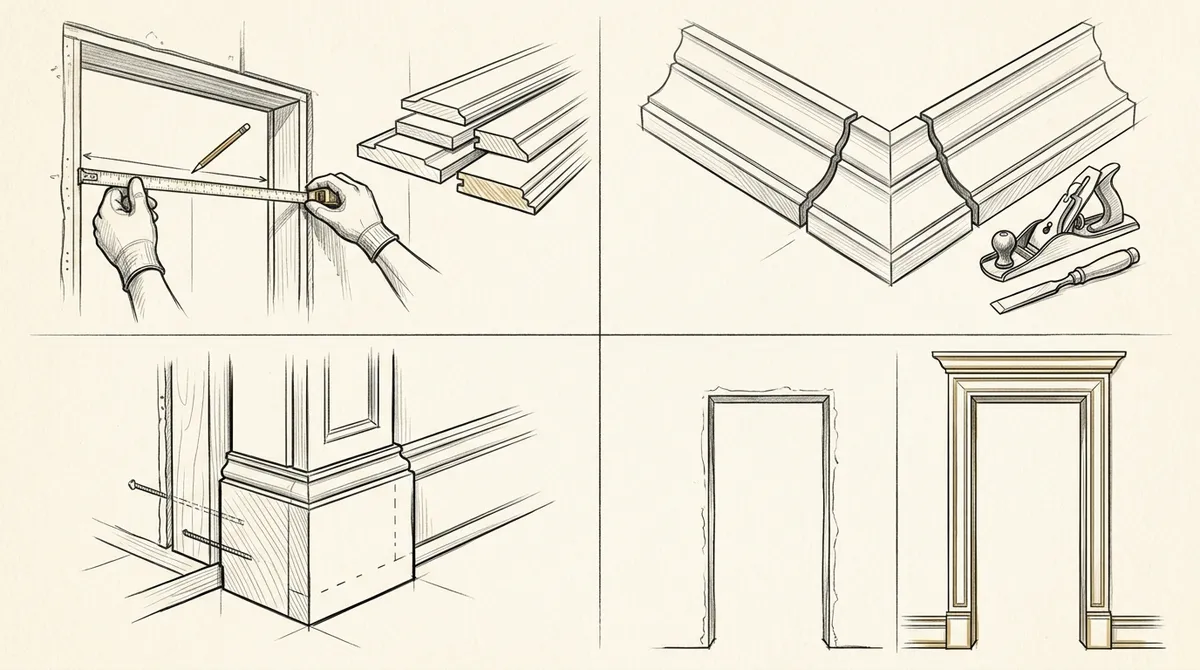
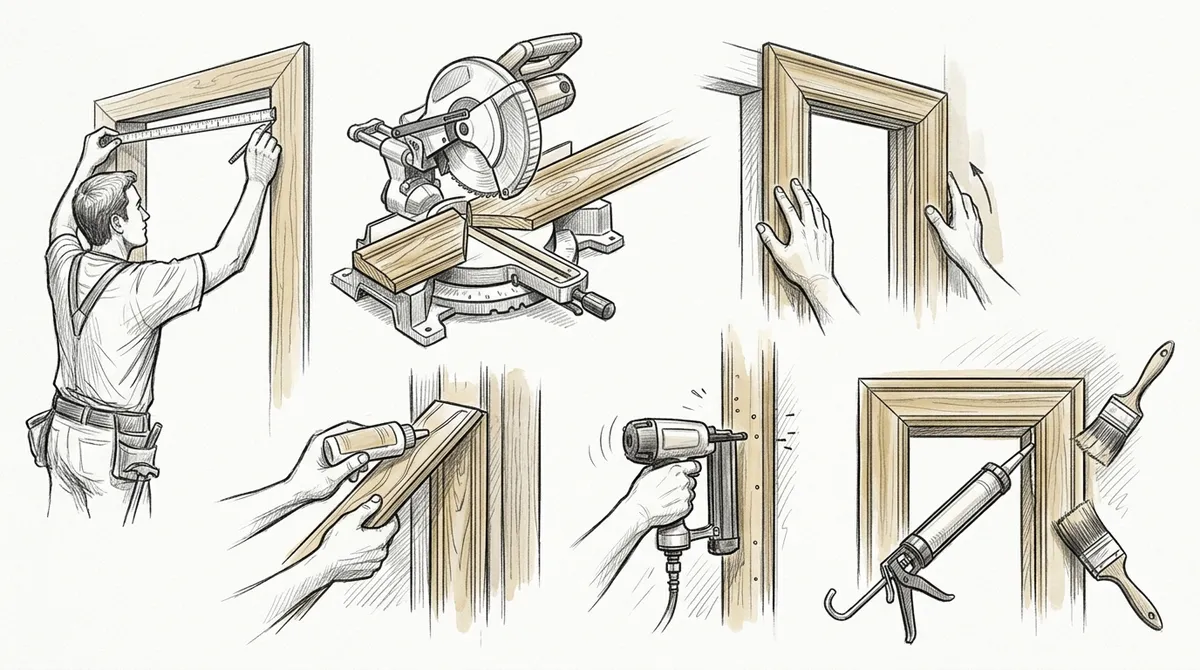
- Measure the door opening: Precise measurements ensure the trim fits perfectly on all three sides — two legs and a header.
- Select your trim profile: Choose a casing style that complements your interior design theme.
- Mark the reveal: The reveal is the small gap left between the edge of the door jamb and the trim. Typically, this is about 3/16 of an inch.
- Cut the header piece: The top horizontal piece is cut with miter angles on each end for clean corners.
- Cut the leg pieces: The two vertical side pieces are cut to length, with miter cuts at the top to meet the header.
- Dry fit the pieces: All three pieces are tested for fit before any fasteners are applied.
- Nail and glue the trim: Secure each piece using finish nails and construction adhesive for a strong hold.
- Fill nail holes and sand: Wood filler covers nail holes, followed by sanding for a smooth surface.
- Prime and paint or stain: The final finish is applied to match your interior color scheme or wood tones.
Each step requires skill and attention to detail. A professional carpenter ensures every angle is tight and every surface is smooth before the final finish goes on.
Comparing Door Trim Materials
The material you choose for your door trim affects both appearance and durability. Here is a quick comparison to help you decide:
| Material | Best For | Key Advantage | Consideration |
|---|---|---|---|
| Solid Wood | High-end custom homes | Rich grain, stainable, durable | Can expand with humidity |
| MDF (Medium Density Fiberboard) | Painted trim applications | Smooth surface, consistent profile | Not ideal for high-moisture areas |
| Finger-Jointed Pine | Budget-conscious projects | Affordable and widely available | Designed for paint only |
| Poplar | Painted interior trim | Stable and easy to paint | Not ideal for natural stain finish |
| Hardwoods (Oak, Maple, Cherry) | Stained trim and luxury finishes | Beautiful grain, premium look | Higher material cost |
For most Tampa Bay homeowners, solid wood or poplar trim with a quality paint finish is a popular and durable choice. Your carpenter can guide you toward the best option for your specific rooms and budget goals.
How Door Trim Connects to Your Overall Interior Design
Door trim does not exist in isolation. It connects to a broader design system throughout your home. When planning door trim installation, consider how it relates to:
- Baseboards and floor transitions
- Window casing profiles
- Crown molding and ceiling details
- Wainscoting and wall panel designs
- Built-in cabinetry and shelving
Consistency across these elements creates a cohesive, high-end interior. Explore how wall enhancements pair perfectly with detailed door trim to create a unified, polished look throughout your home.
You can also see how ceiling designs like coffered ceilings and tray ceilings work alongside door trim to create architectural continuity in each room.
Door Trim for Real Estate and Development Projects
Real estate developers know that interior finishes drive buyer perception. Door trim installation is one of the highest-impact details you can add to a property. Buyers notice trim quality immediately, even if they cannot always articulate why a home feels more premium.
Upgrading from flat, builder-grade casing to a layered or craftsman profile instantly adds a luxury feel. This is especially effective in model homes and staged properties. Pair door trim upgrades with custom cabinetry and quality flooring for a complete high-end interior package.
You can also review 7 built-in cabinetry solutions that work alongside door trim to deliver a complete luxury finish in any development project.
Common Mistakes to Avoid in Door Trim Installation
Even experienced DIYers run into problems with trim work. Here are the most common issues — and why professional installation prevents them:
- Inaccurate miter cuts: Even a one-degree error leaves a visible gap at the corner joint. Professionals use precision tools to nail every angle.
- Skipping the reveal: Without a proper reveal, the trim can interfere with door operation and looks crowded against the jamb.
- Using the wrong fasteners: Too few nails or nails placed incorrectly cause trim to warp or separate over time.
- Poor caulking and filling: Gaps and nail holes left unfilled look sloppy, especially after painting.
- Mismatched profiles: Using different casing profiles across a home creates a disjointed, amateur look.
These pitfalls are avoidable when you work with skilled craftsmen who take pride in every detail. Learn about the 7 signs you need professional carpentry near you today to know when it is time to call an expert.
Finishing Touches That Make a Difference
The finishing stage of door trim installation is where craftsmanship truly shows. Here are the steps that take trim work from good to exceptional:
- Back-priming: Sealing the back of the trim before installation reduces moisture absorption and warping.
- Quality caulk: A thin bead of paintable caulk along the wall edge creates a seamless look.
- Fine sanding between coats: Light sanding between paint coats creates a glass-smooth finish.
- Semi-gloss or satin paint: These sheens are durable and cleanable — ideal for high-traffic door areas.
For those interested in adding extra richness, professional painting services ensure the trim finish complements your entire interior color scheme perfectly.
You can also explore how trim and molding transform your space with style to see real examples of how these finishing details elevate a home’s interior.
Why Choose Bucheli Trim for Your Door Trim Installation
At Bucheli Trim, we bring precision and craftsmanship to every door trim installation project in the Tampa Bay area. Our team understands that trim work is not just a finishing detail — it is the signature of a well-built interior. We work closely with homeowners, interior designers, and developers to deliver results that exceed expectations every time.
From selecting the right profile to the final coat of paint, we manage every step with care. Visit us on Google to read reviews from satisfied clients across Tampa Bay and see why so many homeowners and developers trust us with their carpentry needs.
You can also explore our custom projects gallery to see the full range of carpentry work we deliver — including stunning door trim installations across a variety of home styles.
Additionally, explore how our doors services pair with expert trim installation for a seamless, high-end result throughout your home. And for design inspiration, the concept of crown molding pairs beautifully with door trim to create a fully integrated architectural interior.
Ready to Upgrade Your Door Trim?
Door trim installation is a smart, high-impact upgrade for any home or development project. It adds value, character, and a polished finish that buyers and guests notice immediately. Whether you are updating a single room or outfitting an entire property, the right trim work makes all the difference.
Follow us on Facebook for inspiration, project updates, and tips from our team of expert carpenters. When you are ready to get started, reach out to our team at Bucheli Trim for a consultation and let us bring your vision to life with expert craftsmanship and attention to every detail.
FAQs
Q: What is door trim installation in custom carpentry?
A: Door trim installation is the process of fitting decorative molding — called casing — around a door opening. It covers the gap between the door frame and the surrounding wall, adding a finished and polished look to any room. In custom carpentry, this process goes beyond basic builder-grade casing to include custom profiles, premium materials, and precision craftsmanship.
Q: How long does professional door trim installation take?
A: A single door trim installation by a professional carpenter typically takes one to three hours depending on the complexity of the profile and the condition of the surrounding wall. Homes requiring multiple doors to be trimmed in a consistent style may take one to two days. Proper preparation, fitting, and finishing are all part of the professional process.
Q: What wood is best for door trim?
A: The best wood for door trim depends on your finish goals. Solid hardwoods like oak, maple, or cherry are ideal for stained finishes because of their beautiful natural grain. Poplar and MDF are popular choices for painted trim because they hold paint well and offer a smooth, consistent surface. Your carpenter can recommend the best material for your specific rooms and design goals.
Q: Can door trim be customized to match my interior style?
A: Yes — door trim is highly customizable in custom carpentry. You can choose from a wide range of profiles including colonial, craftsman, ogee, flat modern, or layered designs. A skilled carpenter can also create custom built-up profiles by combining multiple trim pieces for a truly unique look that matches your ceiling designs, wainscoting, and other interior details.
Q: Does door trim installation add value to a home?
A: Yes, door trim installation is one of the most cost-effective ways to add perceived value to a home. Quality trim work signals craftsmanship and attention to detail, which buyers and appraisers notice. For real estate developers and homeowners alike, upgrading to custom door trim profiles can significantly improve the appeal and marketability of a property.